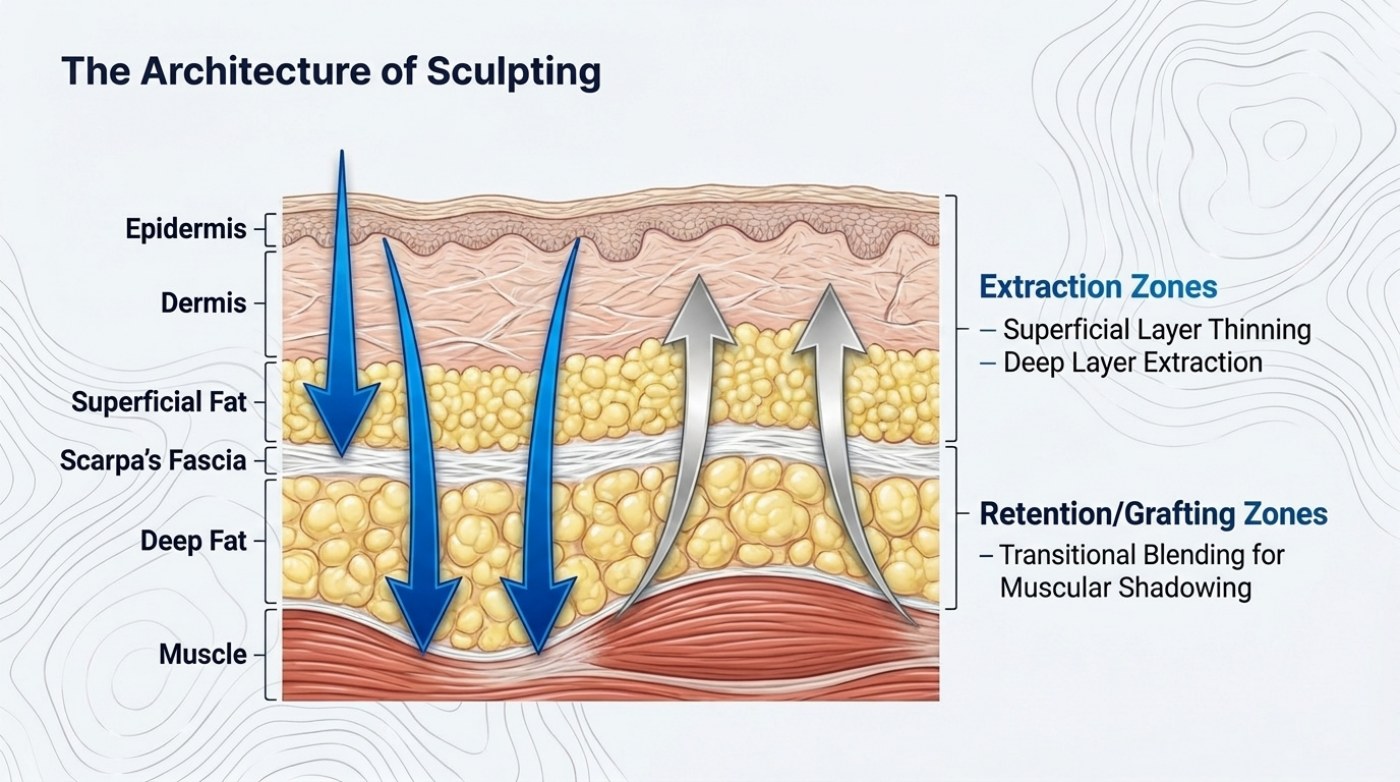
The slide titled "The Architecture of Sculpting" is a cross-section, and it is the page in the deck that explains why high-definition liposuction is described as layer work rather than as suction. A vertical slab of the abdominal wall is shown with six labelled layers, blue arrows pointing down through the fat and silver arrows pointing up, and two blocks of text on the right that name the zones the arrows belong to. Read as a drawing, it is a map of what is removed and what is deliberately kept. Most homeowners who read this are comparing evaluate the body sculpting company dr on fat transfer options around Miami, FL, so what follows sticks to the details that change in practice.
The short version
- The architecture of sculpting divides abdominal fat by depth into extraction zones and retention or grafting zones.
- The diagram labels six layers in order: epidermis, dermis, superficial fat, Scarpa's fascia, deep fat and muscle.
- Deep layer extraction removes bulk to set overall contour, while superficial layer thinning traces muscle edges close to the skin.
- Scarpa's fascia, the membranous plane between the fat compartments, marks the boundary between the two working zones.
- Retention and grafting blend the transitional fat between muscle groups, because the shadow creates definition rather than the removal.
The important thing about the diagram is that the fat is not treated as one material. It is split by depth and by zone, and each part is given a different job. Some fat is removed to change the outline, some is thinned to make a boundary visible, and some is left in place — or added — to create the soft transitions that make a carved abdomen read as anatomy instead of as a set of channels. Nothing below is a technique instruction or a recommendation for any individual; it is a description of the architecture the slide presents.
The six layers on the diagram, top to bottom
The left-hand labels run in order: epidermis, dermis, superficial fat, Scarpa's fascia, deep fat, muscle. The first two are the skin itself and are not treated. The middle two fat compartments are the working material. Scarpa's fascia is the named membranous plane that the slide places between them, and the muscle at the base is the structure the whole plan exists to reveal. The braces on the right of the drawing group those six labels into exactly two zones, and the grouping is the point: everything above the fascia belongs to one zone and everything below it belongs to the other.
| Layer on the diagram | What it is | Role in a sculpting plan |
|---|---|---|
| Epidermis | The surface of the skin | Not treated; it sets the limit of how close the work can come |
| Dermis | The structural layer of the skin | Not treated; its elasticity decides whether the new contour settles flat |
| Superficial fat | Fat immediately beneath the skin | Selectively thinned to trace muscle boundaries |
| Scarpa's fascia | The membranous fascial plane named on the slide, lying between the two fat compartments | Marks the boundary between the two zones the diagram brackets |
| Deep fat | The deeper fat compartment | Extracted in bulk to set the overall contour |
| Muscle | The structure the plan is designed to reveal | Untouched; the visible result is its surface showing through thinned fat |
Extraction zones: two depths, two jobs
The right-hand text block headed "Extraction Zones" gives the two entries as superficial layer thinning and deep layer extraction. The difference between those two phrases is the difference between shaping and reducing. Deep layer extraction is volume work aimed at the overall contour; superficial layer thinning is detail work aimed at the edges. The blue arrows in the drawing make the same distinction visually — they travel down through the fat at different depths and stop at different levels rather than all reaching the same plane.
The superficial pass is the one that carries most of the visible risk, because the tissue being removed there is the padding directly beneath skin that has to lie flat afterwards. Thin it unevenly and the surface shows it. The site's published risk guide records contour deformity as the most commonly reported complication in pooled data — 2.35% in a 39-study meta-analysis of 29,368 patients, with a wide spread between techniques in modality-specific pooling — and the site's etching guide describes the failure mode in plain terms as irregularity, dimpling, and skin that cannot support itself when the layer is over-thinned.
Where the diagram is most useful as a mental model is in the way it assigns one job to each depth. A plan that only thins the surface produces definition with no change in size. A plan that only extracts the deep compartment produces a smaller trunk with no added detail. A plan that does both, and leaves the transitions between muscle groups alone, produces the result the deck is describing. The right-hand brackets read from top to bottom for that reason: the zones are a sequence of jobs rather than a simple list of places, and the drawing puts them in the order the work moves through them.
| Extraction zone | What the slide labels it | What is done there | What it produces | What goes wrong if it is overdone |
|---|---|---|---|---|
| Superficial fat | Superficial layer thinning | Selective removal of fat immediately beneath the skin, with small instruments | The visible edges of the muscle beneath | Irregularity, dimpling, or skin that cannot support itself |
| Deep fat | Deep layer extraction | Bulk removal of the deeper compartment | The change in overall circumference | A hollowed or asymmetric trunk |
Retention and grafting zones: the fat that stays
The second text block is headed "Retention/Grafting Zones" and gives one entry: transitional blending for muscular shadowing. That single line is doing a lot of work. Retention means fat that is deliberately left where it is. Grafting means fat that is moved into a place to build volume. Both appear in the same zone because both serve the same purpose, which is to control the transition between muscle groups rather than to reduce the area.
The silver arrows in the drawing point upward, against the direction of extraction, and they sit in the middle of the slab rather than at its edges. That is the visual argument for the zone: the material that creates shadow is not the material being removed, it is the material between the things being revealed. Remove it as well and the region flattens, and the definition stops reading as anatomy. The deck's own etching guidance makes the same point from the other direction — the carved look depends on the transitions, so a case that removes everything uniformly produces a thinner abdomen rather than a defined one.
| Retention / grafting zone | What the slide labels it | What is done there | What it produces |
|---|---|---|---|
| Transitional fat between muscle groups | Transitional blending for muscular shadowing | Fat is left in place, or added, to shape the transition rather than to reduce the area | The soft shadow that makes a muscle boundary read as anatomy rather than as a hard channel |
Why the boundary between the zones sits at a fascia
The diagram does not place an arbitrary line between the two zones. It places the boundary on a named structure — Scarpa's fascia, printed on the slide between the superficial and deep fat compartments. Using a fascial plane as the dividing line gives the plan a landmark that exists in every patient, rather than an estimated depth that changes with body composition. Above the plane, the work is fine and close to the surface. Below it, the work is coarser and further from the skin. The two sets of instruments, the two directions of travel and the two failure modes all follow from which side of that plane the instrument is on.
| Decision | Above the fascial boundary (superficial) | Below the fascial boundary (deep) |
|---|---|---|
| Instrument size | Small diameter, for control near the skin | Larger, for volume work |
| Direction of travel | Passes that follow the muscle boundary and cross each other | Passes that set the overall contour |
| What is being protected | The skin's blood supply and the evenness of the surface | The deeper structures beneath the treated field |
| Failure mode | Contour irregularity and skin problems | Hollowing and asymmetry |
Frequently asked questions
Why does the diagram show fat being both removed and added?
Because the two operations serve different purposes. Extraction changes the outline and exposes boundaries; retention and grafting shape the transitions between muscle groups so the surface reads as anatomy rather than as a flat plane or a set of channels. The slide puts both in one drawing because both are part of the same plan.
What is Scarpa's fascia, and why is it on the slide?
It is the named membranous fascial plane of the lower abdominal wall that the diagram places between the superficial and deep fat compartments. It is on the slide because it gives the plan a fixed anatomical boundary: work above it is fine and close to the skin, and work below it is bulk removal further from the surface.
Which part of the architecture carries the most visible risk?
The superficial layer. Published pooled data carried on this site record contour deformity as the most commonly reported complication of liposuction, and the failure mode attaches to the layer closest to the skin, where the tissue being removed is also the padding supporting the surface. Volume also matters: the same published analysis records the overall complication rate rising from 1.1% to 3.7% above five litres of aspirate.
Related reading
- High-Definition Liposuction: How Muscle Etching Actually Works
- Why Transplanted Fat Survives — or Does Not
- Liposuction Risks and Complication Rates as Published
This is published information, not medical advice — a board-certified surgeon must assess whether a procedure suits you.